Mastering Cross-Table Joins with Airtable API: A Comprehensive Guide
Introduction
Airtable has revolutionized the way businesses manage and organize their data, offering a user-friendly interface combined with powerful database capabilities. At the heart of Airtable's flexibility lies its API, which allows developers to integrate Airtable's functionality into their own applications and workflows.
One of the most powerful features of Airtable is its ability to create relationships between data across different tables. These cross-table relationships are essential for complex data management tasks, allowing users to link related information and create a more comprehensive view of their data ecosystem.
This guide aims to demystify the process of performing cross-table joins using the Airtable API. Whether you're a seasoned developer looking to optimize your data operations or a curious Airtable user wanting to expand your skills, this article will provide you with the knowledge and tools to master this crucial aspect of data management in Airtable.
Throughout this guide, we'll cover:
- The fundamentals of linked records in Airtable
- Step-by-step instructions for implementing cross-table joins using the Airtable API and JavaScript client
- How to use BaseQL to simplify Airtable queries and perform cross-table joins with ease
By the end of this article, you'll have a solid understanding of how to perform cross-table queries in Airtable, enabling you to create more powerful and interconnected data solutions for your projects or organization.
Understanding Linked Records in Airtable
One of Airtable's most powerful features, which differentiates it from simple spreadsheet tools like Excel and Google Sheets, is the ability to link records across multiple tables. This feature allows you to transform your data from a simple spreadsheet into a powerful relational database.
How to Create Linked Records in Airtable
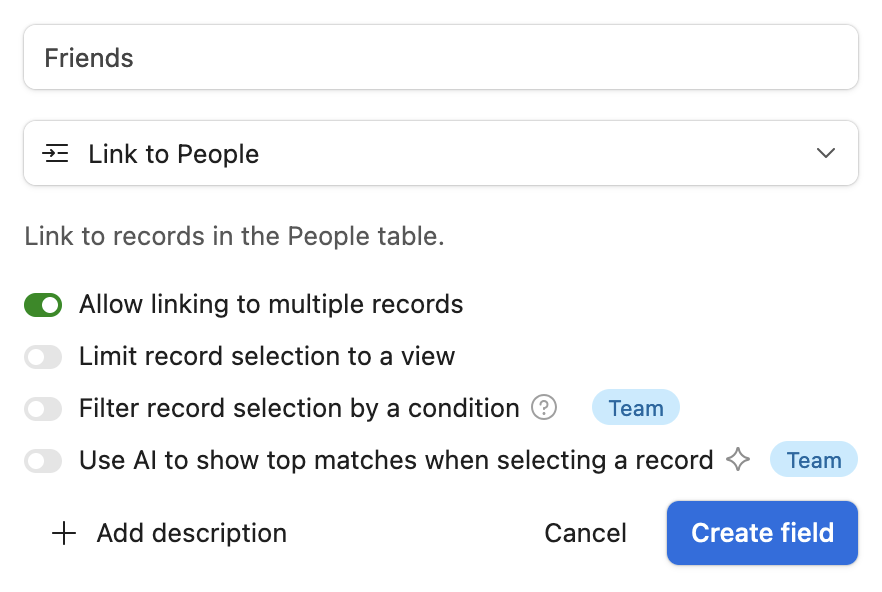
Creating linked records in Airtable is as simple as adding any other field in Airtable. Once you have one or more tables Airtable base, add a field to the table you'd like to create linked records on, and select the "Link to another record" field type.

Next, select the table which will contain the linked records. If you'd like to link records within the same table, select the same table on which you're creating the new field. Otherwise, select another table. The "Allow linking to multiple records" option allows you to control whether each record can be linked to a single record (a one-to-one relationship) or multiple (a one-to-many relationship).
Once you've created a relationship column, you can simply link individual records by clicking the plus (+) sign and selecting the related record from the linked table. You can even add additional records to the linked table directly in the link dropdown.
Example Relational Database in Airtable
For example, the Base below contains two relationships on the People table:
- The "city" field is a one-to-one relationship between People and Cities, allowing us to connect each person to a city
- The "friends" field is a one-to-many relationship within the People table, allowing us to connect each person to any number of other people within the table
Throughout this guide, we'll use this example database to demonstrate how to perform cross-table joins using the Airtable API.
People Table
Cities Table
Implementing Cross-Table Joins Using the Airtable API
Airtable's many integrations allow users to simply connect their Airtable data to many third-party applications and tools. However, advanced users of Airtable often require additional flexibility to unlock the full power of Airtable's database features. For this reason, Airtable provides a Web API which allows developers to integrate their Airtable data with any external system, including existing or custom-built applications and user interfaces.
One common issue faced by developers getting started with the Airtable API is figuring out how to perform cross-table queries, also known as joins, which are a key feature of any relational database. Airtable's API unfortunately does not support automatic joins, which means developers must implement their own logic to perform cross-table queries. In the following sections, we'll walk through the steps required to perform a cross-table join using the Airtable API.
Example: Joining the People and Cities Tables
Imagine we would like to join the People and Cities tables to find the name of the city where each person lives. To do so, we will need to perform the following steps:
- Call the API get all records from the People table
- For each record in the People table:
- Get the city ID from the city column
- Call the API to get the city with the given ID
Let's walk through this process step by step.
List All Records in the People Table
We can list all the records in the People table by making a GET request to the People table, which will return our list of records in JSON format. Note that the Airtable API only returns 100 records at a time by default, so if you have a large database you may need to implement additional logic to support pagination. Since our table only contains six records, the request returns all records:
Example Request Using cURL
curl "https://api.airtable.com/v0/appuzDcQEvfnkzXjD/People" \
  -H "Authorization: Bearer YOUR_SECRET_API_TOKEN"
Example Response
{
  "records": [
    {
      "id": "recTBXaf06UA1upSo",
      "createdTime": "2020-04-07T20:16:01.000Z",
      "fields": {
        "Name": "ben",
        "Friends": [
          "receMowKTCEvlRjXN",
          "recgDVPvmK20JMNOO"
        ],
        "city": [
          "recU2gYBKYIx2jBf2"
        ],
        ...
      }
    },
    {
      "id": "recWvRToDvW9Pj2Gq",
      "createdTime": "2020-04-07T14:23:55.000Z",
      "fields": {
        "Name": "john",
        "Friends": [
          "recgDVPvmK20JMNOO",
          "receMowKTCEvlRjXN"
        ],
        "city": [
          "rechgyzQakpOmRpk0"
        ],
        ...
      }
    },
    {
      "id": "recbconheRM3LZnwB",
      "createdTime": "2020-04-07T14:23:55.000Z",
      "fields": {
        "Name": "anna",
        "Friends": [
          "recTBXaf06UA1upSo",
          "receMowKTCEvlRjXN"
        ],
        "city": [
          "recBLo2JBFM25PNKc"
        ],
        ...
      }
    },
    {
      "id": "receMowKTCEvlRjXN",
      "createdTime": "2020-04-07T14:23:55.000Z",
      "fields": {
        "Name": "peter",
        "Friends": [
          "recWvRToDvW9Pj2Gq",
          "recTBXaf06UA1upSo"
        ],
        "city": [
          "recqqb8GQ0NpeqMt2"
        ],
        ...
      }
    },
    {
      "id": "recgDVPvmK20JMNOO",
      "createdTime": "2020-04-07T20:16:09.000Z",
      "fields": {
        "Name": "daniel",
        "Friends": [
          "recTBXaf06UA1upSo",
          "recbconheRM3LZnwB"
        ],
        "city": [
          "rec83096eXFiyGt4q"
        ],
        ...
      }
    },
    {
      "id": "recveRECBXPUY7sWW",
      "createdTime": "2020-04-12T11:23:16.000Z",
      "fields": {
        "Name": "Rob",
        "Friends": [
          "recWvRToDvW9Pj2Gq",
          "receMowKTCEvlRjXN"
        ],
        "city": [
          "recTqlWA9O2VLcQlB"
        ],
        ...
      }
    }
  ]
}
Joining Records from the City table
As shown above, the initial API response only contains the IDs of the fields linked to each record in the People table. Thus, to fully join the two tables we will need to perform additional API requests to retrieve each linked city record.
For example, to get Ben's city, we would need to request the record with ID recU2gYBKYIx2jBf2 from the Cities table:
Example Request Using cURL
curl "https://api.airtable.com/v0/appuzDcQEvfnkzXjD/Cities/recU2gYBKYIx2jBf2" \
  -H "Authorization: Bearer YOUR_SECRET_API_TOKEN"
Example Response
{
  "id": "recU2gYBKYIx2jBf2",
  "createdTime": "2020-04-15T02:56:10.000Z",
  "fields": {
    "People": [
      "recTBXaf06UA1upSo"
    ],
    "Name": "Monterrey",
    "Country": "🇲🇽Mexico",
    ...
  }
}
Now we know that Ben's linked city is Monterrey, Mexico. To complete the join, we will need to repeat this API call to retrieve the Cities data for each person in our initial API response.
Full Example Using Airtable Javascript Library
The Airtable Javascript Library simplifies the process of calling the Airtable API and processing the results. We can use this library to perform each API request described above, allowing us to join the People and Cities tables to find each person's linked city.
Example Code Using Airtable Javascript Library
Let's examine a code example that demonstrates how to use the Airtable JavaScript library to join data from the People and Cities tables:
- First, we import the Airtable library and create a connection to our specific base using an API key.
- We then fetch all records from the 'People' table using
base('People').select(). - For each person, we retrieve their associated city record with
base('Cities').find(), using the city ID stored in the person's record. - Once we have both the person and city data, we log a message displaying the person's name and their city.
- This process repeats for all records in the 'People' table, effectively joining the two tables.
- Error handling is implemented to catch and log any issues during the API calls.
This method demonstrates a manual join operation between two Airtable tables using multiple API calls. While it works, it may not be the most efficient approach for large datasets or complex relationships. In the next section, we'll explore a more streamlined solution using BaseQL.
var Airtable = require('airtable');
var base = new Airtable({apiKey: process.env.AIRTABLE_API_KEY})
   .base('appuzDcQEvfnkzXjD');

base('People').select().eachPage(function page(people, fetchNextPage) {
    people.forEach(function(person) {
        base('Cities').find(person.fields.city[0], function(err, city) {
            if (err) { console.error(err); return; }
            console.log(`${person.fields.Name} is from ${city.fields.Name}`);
        });
    });

    fetchNextPage();
}, function done(err) {
    if (err) { console.error(err); return; }
});
Example Output
anna is from Los Angeles
john is from Seattle
peter is from New York
ben is from Monterrey
Rob is from Montreal
daniel is from St. Louis
Using BaseQL to Simplify Cross-Table Queries in Airtable
BaseQL is a service that provides an alternative API for Airtable bases, offering native support for cross-table queries and joins. It uses GraphQL, an open-source API query language, to simplify complex data retrieval operations.
Advantages of Using BaseQL
- Simplified querying: Write complex cross-table joins with a single GraphQL query
- Improved performance: Reduce API calls and speed up your data retrieval
- Flexible integration: Easily incorporate BaseQL into your existing projects
Example: Joining People and Cities Tables with BaseQL
Let's revisit our previous example of joining the People and Cities tables, this time using BaseQL.
GraphQL Query
To get the full list of People, including their name as well as the name of the attached City, we would use the following query:
{
  people {
    name,
    city {
      name
    }
  }
}
Sending the Query
To send the query to BaseQL, we use a POST request:
curl -X POST -H "Content-Type: application/json" \
https://api.baseql.com/airtable/graphql/appuzDcQEvfnkzXjD \
  --data '{ "query": "{ people { name,  city { name } } }" }'
Example Response
{
  "data": {
    "people": [
      {
        "name": "ben",
        "city": [
          {
            "name": "Monterrey"
          }
        ]
      },
      {
        "name": "john",
        "city": [
          {
            "name": "Seattle"
          }
        ]
      },
      {
        "name": "anna",
        "city": [
          {
            "name": "Los Angeles"
          }
        ]
      },
      {
        "name": "peter",
        "city": [
          {
            "name": "New York"
          }
        ]
      },
      {
        "name": "daniel",
        "city": [
          {
            "name": "St. Louis"
          }
        ]
      },
      {
        "name": "Rob",
        "city": [
          {
            "name": "Montreal"
          }
        ]
      }
    ]
  }
}
Processing the Results in JavaScript
With the results from our BaseQL query, we can now easily process and display the joined data. This approach significantly simplifies the process of working with linked records across tables in Airtable. Let's take a look at how we can handle these results in JavaScript.
Here's an example of how we can use JavaScript to fetch and process the results from our BaseQL query:
Example JavaScript Code to Process Results of BaseQL Query
fetch('https://api.baseql.com/airtable/graphql/appuzDcQEvfnkzXjD', {
  method: 'POST',
  headers: {
    'Content-Type': 'application/json',
  },
  body: JSON.stringify({query: "{ people { name,  city { name } } }"})
})
  .then(r => r.json())
  .then(response => {
    response.data.people.forEach(person => {
      console.log(`${person.name} is from ${person.city[0].name}`);
    });
  });
Example Output
ben is from Monterrey
john is from Seattle
daniel is from St. Louis
peter is from New York
Rob is from Montreal
anna is from Los Angeles
Taking Your Airtable Data Management to the Next Level with BaseQL
Now that you've learned about cross-table joins in Airtable, why not take your data management to the next level? BaseQL offers a powerful, intuitive solution for handling complex queries and relationships in your Airtable bases.
Here's why you might want to give BaseQL a try:
- Simplified querying: Write complex cross-table joins with a single GraphQL query
- Improved performance: Reduce API calls and speed up your data retrieval
- Flexible integration: Easily incorporate BaseQL into your existing projects
Ready to streamline your Airtable data operations? Start your journey with BaseQL today:
- Sign up for a free BaseQL account
- Follow our quick-start guide to connect your Airtable base
By leveraging BaseQL, you'll be able to focus more on building great applications and less on the intricacies of API management. Give it a try and see how it can transform your Airtable workflow!
Conclusion
Cross-table joins in Airtable are a powerful feature that allows you to connect and analyze data across multiple tables. This guide has covered two main approaches:
- Using the Airtable API directly, which requires multiple API calls and manual data processing
- Utilizing BaseQL, a GraphQL-based solution that simplifies cross-table queries with a single request
Both methods have their advantages, with the direct API offering more control and BaseQL providing a more streamlined experience. Choose the approach that best fits your project's needs and complexity.
By mastering these techniques, you can unlock the full potential of your Airtable databases, enabling more complex data relationships and insights in your applications and workflows.
Additional Resources
- Airtable API Documentation - Official documentation for the Airtable API
- Airtable.js Library - Official JavaScript library for working with the Airtable API
- BaseQL Documentation - Comprehensive guide to using BaseQL for Airtable queries