How to Create a GraphQL API for Airtable
Airtable is a cloud-based platform that merges spreadsheet simplicity with database functionality, offering an intuitive interface for managing relational databases. Its robust capabilities make it ideal for GraphQL integration, enabling efficient cross-table queries.
While Airtable's REST API is powerful, it lacks native support for complex cross-table queries. GraphQL addresses this limitation by allowing nested queries that easily navigate table relationships, unlocking Airtable's full potential as a relational data structure.
This article guides you through creating a GraphQL API for your Airtable base using BaseQL, combining Airtable's flexibility with GraphQL's efficient querying to streamline data retrieval in client applications.
Introduction
Airtable: Overview and Advantages
Airtable is a cloud-based platform that merges spreadsheet simplicity with database functionality. Its key benefits include:
- Flexible data organization with custom fields and linked records
- User-friendly interface accessible to technical and non-technical users alike
- Robust collaboration features for enhanced team productivity
- Extensive integration capabilities with third-party apps and services
These features make Airtable an excellent choice for businesses and individuals looking to streamline their data management processes. Its versatility allows it to be used across various industries and for diverse purposes, from project management to inventory tracking.
Introduction to GraphQL and its advantages
GraphQL is a powerful query language for APIs that offers a more efficient and flexible alternative to traditional REST APIs. It allows developers to request precisely the data they need, reducing unnecessary data transfer and improving application performance. Key advantages of GraphQL include:
- Precise data fetching: Clients can request exactly what they need, eliminating over-fetching and under-fetching of data
- Single endpoint: All data can be accessed through a unified API endpoint, simplifying API management
- Strong typing: GraphQL schemas provide clear contracts between client and server, enhancing reliability and developer experience
These features of GraphQL make it particularly well-suited for use with Airtable's relational data structure. By combining GraphQL's querying power with Airtable's flexible data management, developers can create more efficient and responsive applications. This is where BaseQL comes in, bridging the gap between Airtable's data structure and GraphQL's querying capabilities.
Overview of BaseQL and how it bridges Airtable and GraphQL
BaseQL is a service that automatically generates a GraphQL API for your Airtable bases. It acts as a bridge between Airtable's data structure and the powerful querying capabilities of GraphQL.
Here are some key features and benefits of BaseQL:
- Automatic schema generation: BaseQL creates a GraphQL schema based on your Airtable base structure
- Seamless integration: Allows you to leverage GraphQL's benefits without changing your Airtable setup
- Enhanced querying: Enables complex queries and data relationships that might be challenging with Airtable's native API
- Improved performance: Optimizes data fetching, potentially reducing API calls and improving application speed
By combining Airtable's flexible data management with GraphQL's efficient querying through BaseQL, developers can more easily create powerful and responsive applications while maintaining the ease of use that Airtable provides for data management.
Airtable Setup
Now that we've explored the benefits of combining Airtable with GraphQL through BaseQL, let's move on to the practical steps of setting up your Airtable base for integration. Before we dive into creating a GraphQL API for your Airtable base, it's crucial to ensure that your base is properly configured. This section will guide you through the essential steps to prepare your Airtable base for seamless integration with BaseQL.
Creating Your Airtable Base
If you haven't already, create an Airtable base to serve as the foundation for your GraphQL API. Keep these best practices in mind:
- Design your tables with clear, descriptive names
- Use appropriate field types for your data (e.g., text, number, date, etc.)
- Establish relationships between tables using Airtable's linking feature
Sample Airtable Base
If you don't have a database yet, you can clone our template database by clicking this link
Preparing for API Access
To connect BaseQL to your base, you'll need to create a Personal Access Token—a secure method for authenticating Airtable API access. Here's what you should know about Personal Access Tokens in Airtable:
- Security: They provide a secure way to authenticate API requests without sharing your Airtable password
- Scoped access: You can limit the token's permissions to specific bases or actions
- Revocable: You can easily revoke a token if it's compromised or no longer needed
Creating Your Personal Access Token
To create a Personal Access Token, follow these steps:
- Go to the Airtable Builder Hub
- Navigate to the “Personal access token” section
- Click on "Create new token"
- Choose the following permissions (scopes) for the Personal Access Token to enable BaseQL to connect to your Airtable base:
- `data.records:read`: This permission will allow BaseQL to read records from your Airtable base, enabling it to fetch data for GraphQL queries.
- `schema.bases:read`: This scope will give BaseQL access to read the schema of your Airtable bases, which is necessary for generating the GraphQL schema based on your Airtable structure.
- `data.records:write` (Optional): This optional permission will enable BaseQL to modify records in your Airtable base. Include this if you plan to use GraphQL mutations for creating, updating, or deleting data.
- Under "Access," select the base for which you want to create a GraphQL API
- Save the generated token securely - you'll need it for the next step
Remember to keep your Personal Access Token confidential, as it grants access to your Airtable data.
With these steps completed, your Airtable base will be ready for integration with BaseQL to create your GraphQL API. In the next section, we'll walk through the process of setting up BaseQL and connecting it to your Airtable base.
Setting Up BaseQL
Now that your Airtable base is prepared, let's walk through the process of setting up BaseQL and connecting it to your Airtable base. This section will guide you through creating a BaseQL account and establishing the connection between BaseQL and your Airtable data.
Creating a BaseQL Account
To get started with BaseQL, you'll need to create an account. Follow these steps to create a free BaseQL account:
- Visit the BaseQL website at https://app.baseql.com
- Create an account by logging in with a Google or Github account
- Click the Get Started button to navigate to your BaseQL dashboard
Connecting Your Airtable Base to BaseQL
Once you have a BaseQL account, you can easily connect your Airtable base. Here's how:
- Navigate to the BaseQL Dashboard
- Click "Add New Data Source" and select "Airtable"
- Look for an option to "Connect Airtable" or "Add New Base"
- You'll be prompted to enter your Airtable Personal Access Token. Paste the token you created earlier
- Select the Airtable base you want to connect from the list of available bases
- BaseQL will automatically generate a GraphQL schema based on your Airtable base structure
After completing these steps, you'll be taken to a GraphQL Explorer. This interface allows you to visually construct and test queries against your Airtable data, providing an intuitive way to interact with your newly created GraphQL API.
Verifying the Connection
To verify that BaseQL has successfully connected to your Airtable base and generated a GraphQL schema, you can perform a simple test query in the GraphQL Explorer. Here's a basic example:
query {
  __schema {
    types {
      name
    }
  }
}
This query will return a list of all types in your GraphQL schema, which should correspond to the tables and fields in your Airtable base. If you see your Airtable table names in the results, it confirms that the connection is working correctly.
After verifying the connection, you can start exploring the full capabilities of your GraphQL API. The BaseQL Explorer provides an intuitive interface for constructing and testing queries, allowing you to interact with your Airtable data in powerful new ways. Let's dive into some practical examples of how to use BaseQL to query and manipulate your data.
Getting Started with BaseQL
Now that you have successfully set up BaseQL and connected it to your Airtable base, it's time to start exploring the powerful features of your new GraphQL API. In this section, we'll dive into the practical aspects of using BaseQL, starting with the BaseQL Explorer - a powerful tool for interacting with your API.
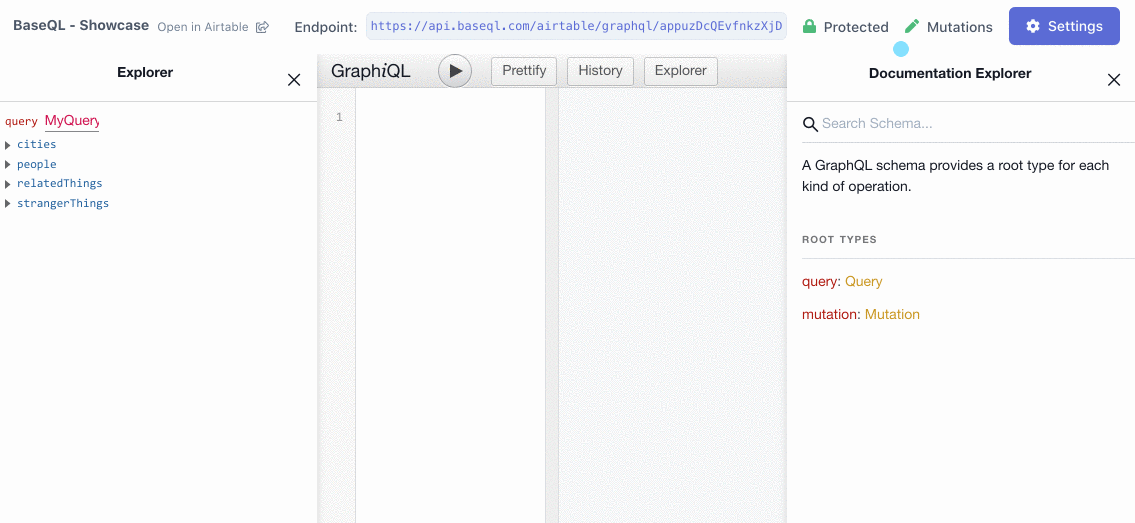
Using the BaseQL Explorer
BaseQL offers an **Advanced GraphiQL Explorer** that allows you to read the *API documentation* on-site and construct complex queries with ease. You can do this by either clicking options in the *left-side panel* or utilizing the *auto-complete* feature within the editor. The Explorer is the easiest way to develop queries for your GraphQL API.
Writing GraphQL Queries
As demonstrated above, the BaseQL Explorer offers an intuitive graphical interface for developing and testing your GraphQL queries. With this user-friendly tool, you can easily select fields and apply filters, including those for cross-table relationships, simply by interacting with the interface.
To harness the full power of your GraphQL API, we've prepared comprehensive documentation on advanced querying techniques. Explore these resources to enhance your data retrieval capabilities:
Integrating with Custom Applications
BaseQL is compatible with all HTTP and GraphQL clients, making it easy to integrate into any development framework. To use BaseQL, you'll need to provide your chosen tool with your base's GraphQL endpoint. This endpoint is available in the top toolbar of the BaseQL Explorer. Here's an example of a GraphQL endpoint for our sample base:
https://api.baseql.com/airtable/graphql/appuzDcQEvfnkzXjD
For instance, to execute a query in JavaScript, you can utilize the `fetch` API to send a POST request with your query in the request body, as shown in the example below.
fetch('https://api.baseql.com/airtable/graphql/appuzDcQEvfnkzXjD', {
  method: 'POST',
  headers: {
    'Content-Type': 'application/json',
    'Accept': 'application/json',
    'Authorization': 'Bearer SECRET_TOKEN',
  },
  body: JSON.stringify({query: "{ people: { name } }"})
})
  .then(r => r.json())
  .then(data => console.log('data returned:', data));
Conclusion
Creating a GraphQL API for your Airtable base using BaseQL offers a powerful way to enhance your data management and application development capabilities. By following the steps outlined in this guide, you've learned how to:
- Set up your Airtable base and prepare it for API access
- Create a BaseQL account and connect it to your Airtable base
- Use the BaseQL Explorer to construct and test GraphQL queries
- Integrate BaseQL with custom applications using various HTTP and GraphQL clients
With these tools at your disposal, you're now equipped to leverage the flexibility of Airtable's data management alongside the efficiency and power of GraphQL querying. This combination opens up new possibilities for creating more responsive, data-driven applications while maintaining the ease of use that Airtable provides for data management.
Remember to explore the advanced features of BaseQL, such as filtering, sorting, and pagination, to fully harness the potential of your GraphQL API. As you continue to develop and refine your applications, you'll find that the GraphQL API created through BaseQL offers a robust and flexible foundation for your data needs.
Additional Resources
- BaseQL Advanced Base Settings: Discover how to secure your API with a secret token and enable mutations for creating, updating, or deleting data via GraphQL
- Mastering Cross-Table Joins in Airtable: Learn how to leverage BaseQL's powerful cross-table join capabilities to create complex queries that span multiple tables in your Airtable base.
- Official GraphQL Documentation: A comprehensive guide to understanding GraphQL principles and best practices